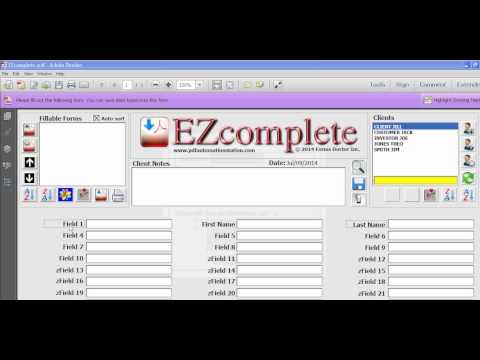
How's it going today? I am the forms doctor and this is the very first video demonstration for Easy Complete. In this video, I will show you how to customize your field names and name them whatever you want them to be. - It's a good idea to look at some of the forms you're going to be populating and get some of the field names from there. - The first thing you need to do is click the switch here and make sure it's pointing up. That turns on the field customization feature. - Next, you'll go right to the field you want to change the name. Click right on the field name, so I'll click on field 2 here. - When this window opens, I will type in what I want to call the field, which is "First Name". This is not a drop-down menu, so I will leave this as "No". Click OK, and you'll see the field name change to "First Name". - Then, I will click on field 3 and call this field "Last Name". I'll type in "Last Name" and click OK. You'll see the field name change to "Last Name". - Now, I'm going to create a drop-down menu for field 1. I'm going to call this "Title". When I click "Yes" here, you'll see this grey turn white, which will allow me to type in all the entries for the drop-down. - Each entry should be on a separate line. I'll type "Mister", press the enter key, and type "Missus". You can also paste all your entries from an Excel column. I've already copied them, so I'll just paste them here, and then I'll click OK. - When you're finished customizing your field names, make sure you turn off this feature and click the Save icon to save your changes. -...
Award-winning PDF software


Online alternatives make it easier to to organize your document management and boost the productivity within your workflow. Carry out the quick guideline for you to finished E33 Change Of address, steer clear of mistakes and furnish it within a timely way:
How to complete a E33 Change Of address on the internet:
- On the web site while using the type, simply click Commence Now and go towards editor.
- Use the clues to fill out the related fields.
- Include your own information and make contact with info.
- Make convinced that you enter suitable knowledge and figures in best suited fields.
- Carefully look at the information within the sort likewise as grammar and spelling.
- Refer to help you part when you've got any problems or deal with our Service group.
- Put an electronic signature on the E33 Change Of address aided by the assistance of Signal Software.
- Once the shape is finished, push Finished.
- Distribute the ready sort through email or fax, print it out or conserve on your own equipment.
PDF editor lets you to make changes with your E33 Change Of address from any internet connected device, personalize it according to your requirements, indicator it electronically and distribute in several options.
Video instructions and help with filling out and completing E33 Change Of address